|
12-3: The Cells Menu |
|
|
12-3: The Cells Menu |
|
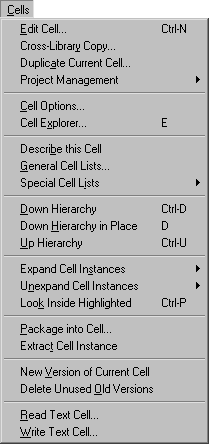
Cell cells are collections of circuitry. Each cell of a cell has a view type (layout, schematic, etc.) and a version number. Because cell instances may be placed inside of other cells, the cell notion defines hierarchy in Electric.
| This command displays an existing cell or creates a new cell in the current window. You are prompted for its name and view type. Use the "New Cell" button to create a new one. | 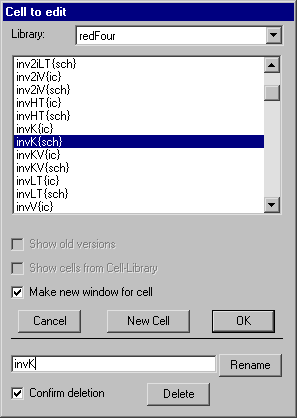 |
| This command presents a dialog that shows cells in two different libraries, and indicating which ones are newer. You can select a cell in either library and copy or move it to the other. In addition, if the cell has subcells or associated views that are newer, they can also be copied. The "Examine Contents" buttons compare the contents cells and displays an indication of whether they are actually different or just out of date. | 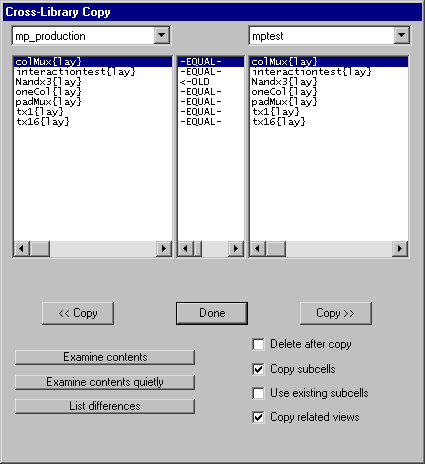 |
This command makes a copy of the cell in the current window and gives it a new name. You will be prompted for the new name. The new cell is placed in the same library as the old one.
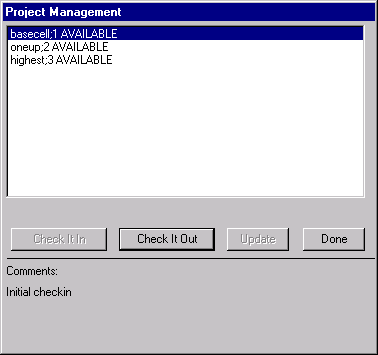
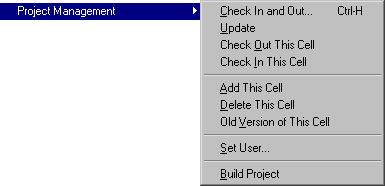 | This set of commands controls the interactions of multiple users working together on a single library. Subcommands are available for checking cells in and out, for updating your personal copy of the library from a master library, and other features. |
 | Check In and Out... |
| ||
| Update | Updates the current library from the master library. | |||
| Check Out This Cell | Checks out a cell from the master library. | |||
| Check In This Cell | Checks the current cell into the master library. | |||
| Add This Cell | Adds the current cell to the master library (if it is not part of the project management system). | |||
| Delete This Cell | Deletes a cell from the master library. | |||
| Old Version of This Cell | Access old versions of a cell. | |||
| Set User... | Sets user identification for project management. | |||
| Build Project | Converts the current library into a master library for subsequent sharing. |
This command presents a dialog that allows cell options to be set. There are check boxes at the top for controling cell modifications, recognizing cell libraries, and recognizing technology editor libraries. Buttons on the right can set or clear these bits for all cells. New instances can be expanded or unexpanded. You can also set each cell's "Characteristic Spacing" (used when arraying, see Section 6-4).
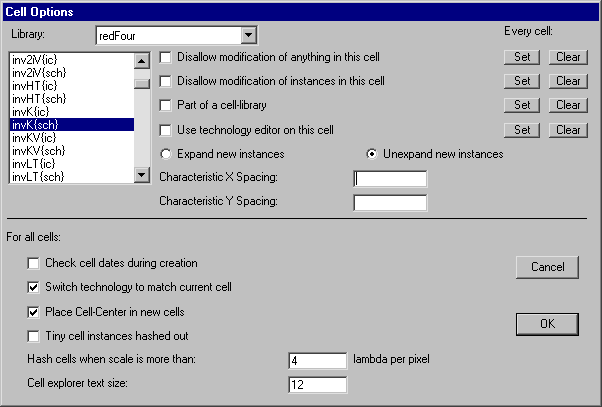
The bottom half of the dialog has options that apply to all cells. The check box "Check cell dates during creation" causes creation and modification information to be used to ensure that the hierarchy has been built in the proper order. The check box "Switch technology to match current cell" causes the current technology to change whenever the current cell changes so that it is appropriate to that cell. The check box "Place Cell-Center in new cells" requests that all newly created cells have a Cell-Center node (named "Facet-Center" for historical reasons) placed at the origin (see Section 3-3 for more on Cell centers). The check box "Tiny cell instances hashed out" causes the contents of cell instances to be a gray hash area when zoomed too far out to be distinguishable. You can control the number of lambda per pixel that triggers the hashing-out of cells.
This command splits the current window, and shows a hierarchical "explorer" window in the left half. A recursively indented list of cells-within-cells is listed, and you can explore your circuit's hierarchy. Note that the cell explorer can also be invoked by clicking on the "tree" icon in the lower-left corner of the window.
This command displays information about the cell in the current window.
|
These presents a dialog for selecting a subset of the cells.
The section labeled "Which cells:" selects the cells to be listed (all, only those used/not used in other cells, only those in the current cell, or only "placeholder" cells: those created because of cross-library dependency failures, see Section 3-9). The section labeled "View filter:" allows only certain views to be displayed. The section labeled "Version filter:" allows removal of older or newer versions of cells. The section labeled "Display ordering:" controls the order in which the selected cells will be listed. The section labeled "Destination:" allows you to dump this listing to a disk file. | 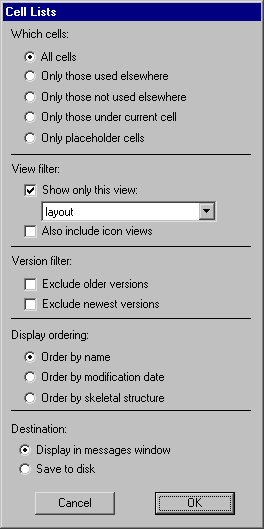 |
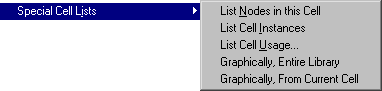 | This set of commands give specialized information about cells. |
| List Nodes in this Cell | This command displays a list of all nodes in the current cell. |
| List Cell Instances | This command displays a list of cell instances contained in the current cell. | |
| List Cell Usage... | This command prompts for a cell and displays a list of places where the it exists as an instance. | |
| Graphically, Entire Library | Creates a graph of every cell in the library. The graph is actually a new cell that contains Artwork components. Thus, it will be stored with the library and may be edited, printed, etc. | |
| Graphically, From Current Cell | Creates a graph showing the current cell at the top, and all subcells below it. The graph is actually a new cell that contains Artwork components. Thus, it will be stored with the library and may be edited, printed, etc. |
This command changes the current edit window so that the cell whose instance is currently highlighted is now the editable cell. When an icon is selected, its contents (schematic) is edited. If the icon is inside of its own schematic (a documentation feature) then going down does edit the icon.
This command changes the current edit window so that the cell whose instance is currently highlighted is now the editable cell. However, if the instance is transformed (rotated or mirrored), it is edited in that orientation.
This command returns editing to the higher level of hierarchy in which the current cell is instantiated. It thus travels back up the hierarchy that was descended with the Down Hierarchy command. If an export is highlighted, that network is highlighted in the outer cell. If there was no Down Hierarchy, and the higher level cell cannot be determined, a list of possible cells will be presented. Arbitrary depth of hierarchy can be traversed with these two commands by repeating them.
 | These commands cause the highlighted cell instances to be expanded, which means that their contents will be displayed. |
| One Level Down | The next level of unexpanded cells is made visible. |
| All the Way | All cells from here to the bottom of the hierarchy are made visible. | |
| Specified Amount... | You are prompted for a number of levels of hierarchy, and that many levels of depth are made visible. |
 | These commands cause the highlighted cell instances to be unexpanded, which means that they will be displayed as black boxes. |
| One Level Up | The next level of expanded cells, from the bottom of the hierarchy, is unexpanded. |
| All the Way | All cells from here to the bottom of the hierarchy are closed. | |
| Specified Amount... | You are prompted for a number of levels of hierarchy, and that many levels of depth are closed. |
This command displays all layout in the currently highlighted area, all the way down the hierarchy. This "peek" into the cell instances is temporary and will not be shown again if the window is redrawn in any way. To get a permanent view into a cell, use the Expand Cell Instances command above or set the "Expand" option in the Get Info command of the Info menu.
This command creates a new cell, possibly in a new cell, that contains all of the circuitry in the currently highlighted area. You will be prompted for the new cell name. The highlighted area is defined as the bounding rectangle of everything that is highlighted. Arcs that cross outside of the bounds will not be copied. A more precise way of defining a highlighted area is to use the rectangle select button.
This command takes the currently highlighted cell instance and replaces it with its contents. This is conceptually the opposite of Package into Cell... as it removes a level of hierarchy. If multiple cell instances are highlighted, all of them are extracted.
This command makes a copy of the cell in the current window. Version numbers appear in the cell name as a semicolon followed by a number (except for the most recent cell which has no version notation). For example, after the duplication of cell MyCircuit, there will be the cells MyCircuit and MyCircuit;1. The current cell, which has no explicit version number in its name, actually is version 2 (smaller version numbers are older).
This command deletes all cells in the current library that are not the most recent version and are not being used as instances in some other cell. It essentially cleans up the library when too many versions have been created. As with all commands, this can be undone with the Undo command of the Edit menu.
This command reads a disk file into the current text window. It replaces the existing contents.
This command saves the current text window to disk.
 |
Previous |  |
Table of Contents | Next |  |