3-7-3: Cell Properties |
3-7-3: Cell Properties |

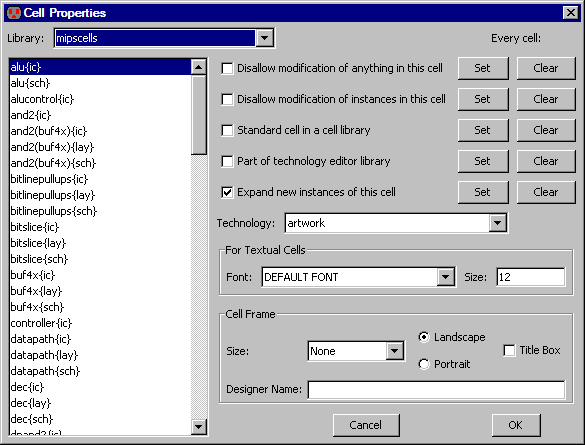
The checkbox "Disallow modification of anything in this cell", allows you to control whether the contents of a cell is editable or not. When modification is disallowed, no changes may be made. This is useful when you want to allow examination without accidental modification.
The checkbox "Disallow modification of instances in this cell", also prevents changes to the selected cell, but in this case, only instances of sub-cells are locked. This is useful when you have a correct instance placement and are doing wiring.
| If you make a change that has been disallowed, a dialog appears that asks if you want to override the lock. |  |
You may make the change ("Yes"), disallow the change ("No"), or remove the lock ("Always", which unchecks the locks in this dialog).
The check box "Standard cell in a cell-library" indicates that this cell is a standard cell and should be treated accordingly. Verilog generation uses this information (see Section 9-4-2).
The check box "Part of technology editor library" indicates that this cell helps to define a technology. For more on the technology editor, see Section 8-1.
The check box "Expand new instances of this cell" indicates whether newly created instances of this cell are expanded (contents visible) or unexpanded (drawn with a black outline) See Section 3-4 for more on expansion.
For the first 5 checkboxes in this dialog, there are buttons on the right which allow you to set or clear these flags for all cells in the library.
Each cell is tied to a specific technology. The cell's technology is set when the cell is created. You can change the technology that is associated with a cell by using the "Technology" popup.
The section labeled "For Textual Cells" lets you set the font and size of the text in that cell (see Section 4-9).
At the bottom is the cell frame control. The frame is a border that is usually drawn around schematics. You can set the frame size, whether it is wider (Landscape mode) or taller (Portrait mode), and whether a title box is drawn in the corner. Additionally, you can set the designer name to be drawn for each cell. Other information in the title box (company name, project name) are set on a per-user or per-library basis with the Frame Preferences (in menu File / Preferences..., "Display" section, "Frame" tab). See Section 7-5-2 for more on frames.
| Previous | Table of Contents | Next |