 |
12-7: The Windows Menu |
|
|
12-7: The Windows Menu |
|
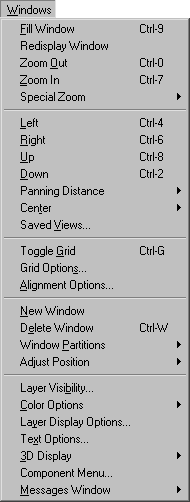
These commands allow manipulation of the editing window. Arbitrary zooming and panning may be done. A grid can be displayed. The window can be split multiple times to show different cells or even different areas of the same cell. Colors, layers, and port labels can be manipulated. Even the menu of components on the left can be altered.
This command causes the cell in the current window to be shifted and scaled so that it fits inside of the window.
This command causes the cell in the current window to be redrawn.
This command causes the cell in the current window to be halved in size so that more of it appears.
This command causes the cell in the current window to be doubled in size so that only the center area remains visible.
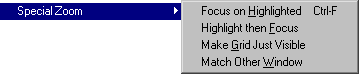 | These commands change the magnification of the display in special ways. |
| Focus on Highlighted | This command shifts and scales the cell in the current window so that the currently highlighted area fills the window. The highlighted area is defined as the bounding rectangle of everything that is highlighted. A more precise way of defining a highlighted area is to use the rectangle select button to drag a rectangle on the screen. | |
| Highlight then Focus | This command waits for the user to drag an area on the screen. After the area has been identified, the window is zoomed so that the area fills the screen. | |
| Make Grid Just Visible | This command zooms to the point where the grid is visible, but any further zoom-out would make it invisible. The grid is displayed. | |
| Match Other Window | This command scales the cell in the current window so that its size matches that of the other window. If there are more than two windows, you will be prompted for the window to match. |
This command causes the cell in the current window to shift left (the window actually moves right). Use the subcommands of the Panning Distance command to control the amount of the shift.
This command causes the cell in the current window to shift right (the window actually moves left). Use the subcommands of the Panning Distance command to control the amount of the shift.
This command causes the cell in the current window to shift up (the window actually moves down). Use the subcommands of the Panning Distance command to control the amount of the shift.
This command causes the cell in the current window to shift down (the window actually moves up). Use the subcommands of the Panning Distance command to control the amount of the shift.
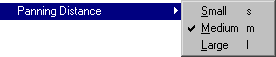 | These commands change the amount by which the panning commands move. |
| Small | This command causes panning commands to shift the screen by 0.15 of its size. | |
| Medium | This command causes panning commands to shift the screen by 0.3 of its size. | |
| Large | This command causes panning commands to shift the screen by 0.6 of its size. |
 | These commands causes the cell in the current window to be shifted so that the desired point is in the center of the window. |
| Selection | This command causes the cell in the current window to be shifted so that the currently highlighted objects are in the center of the window. | |
| Cursor | This command causes the cell in the current window to be shifted so that the current cursor location is in the center of the window. |
This command presents a dialog for saving and retrieving window views (a zoom and pan amount). Saved views are given names which can be used to restore them later.
This command turns on or off the display of the grid.
This command presents a dialog that allows control of the grid spacing in the current window.
| It also allows you to set the default grid spacing for new windows, the number of grid dots between bold ones, and whether or not the grid is aligned with the circuitry. | 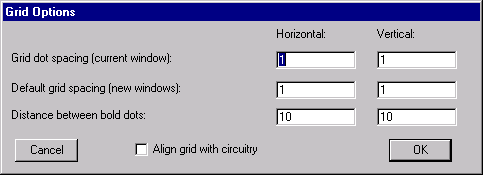 |
| This command presents a dialog that allows control of the alignment of the cursor to grid points, and the alignment of object edges to grid points. Note that the current alignment of the cursor to grid points is shown in the status area under the heading "ALIGN". | 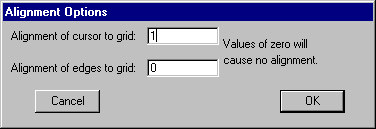 |
This command deletes the current window from the display.
 | These commands control the partitioning of a window into multiple cell displays. |
 | Split | This command causes the current editing window to split in half, with the currently edited cell appearing in both halves. Each half may be split again and again, producing an arbitrary number of nonoverlapping windows. When a window is first split, the direction of split is determined by the aspect ratio of the contents. Once split, however, the direction alternated between horizontal and vertical. When the editing window is divided, only one partition is the "current" window, as shown with a green outline. Be careful about the commands that you issue to be sure that the correct window is affected. Generally, the current window switches to whichever one has the cursor. |
| Delete | This command causes the current partition of the editing window to be joined with its neighbor, thus deleting the subwindow. | |
| Make 1 Window | This command causes all partitions of the editing window to be deleted, returning to a single window with the currently edited cell. |
 | These commands control the layout of windows on the display. |
| Tile Horizontally | This command causes the editing windows to be arranged horizontally, one above the other. |
| Tile Vertically | This command causes the editing windows to be arranged vertically, one next to the other. | |
| Cascade | This command causes the editing windows to be cascaded, one overlapping the other. |
|
This command presents a dialog in which you can select the layers that are to be visible in the window.
Special buttons allow all layers to be made visible or invisible.
It is also possible to set visibility according to layers found in external file formats such as GDS II and DXF.
Note that this dialog is modeless: it can remain up while other editing is done.
The right side of the dialog lets you choose which of the different types of text will be visible (Note that this side is titled "Text visibility options" which means that these settings are saved, whereas those on the left side are not.) | 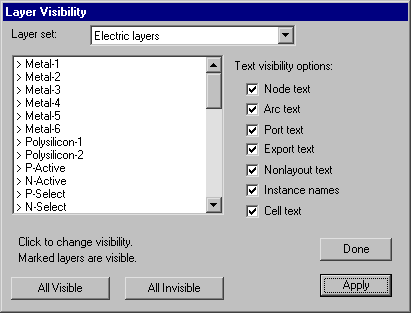 |
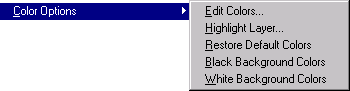 | These commands allow you to edit the color map for the current technology. |
| Edit Colors... | This command displays a color wheel and a set of options for modifying the various entries. |
| Highlight Layer... | This command prompts for a single layer and rebuilds the color map so that the layer is highlighted. The colors can be restored with "None" button of the dialog or with the Restore Default Colors command below. | |
| Restore Default Colors | This command returns the color table to its original values as specified by the current technology. | |
| Black Background Colors | This command sets the color table to its original values as specified by the current technology, but with a black background. | |
| White Background Colors | This command sets the color table to its original values as specified by the current technology, but with a white background. |
| This command displays a dialog for examining and modifying the display of each layer. You can set individual bits in the pattern or you can choose from a set of predefined patterns along the top. You can also choose the color to use. Many layers use their stipple patterns only for printing, but a check box allows you to request that the pattern be used on the display as well. Another check box requests that the stippled polygons be outlined with a solid line. | 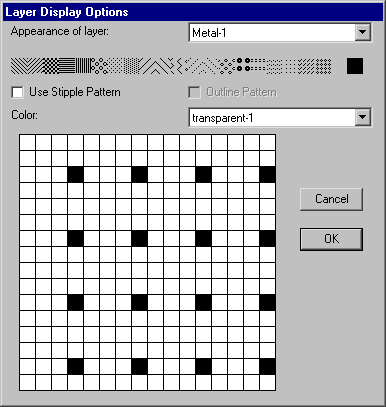 |
| This command provides a dialog for setting the default size and placement of all subsequently created text. Text size can be absolute (in points) or relative (in lambda). The "Smart" placement options apply to export names only. The "New text visible only inside cell" option applies to text objects (created with the Text (nonlayout) subcommand of the New Special Object command of the Edit menu). You can also choose which text editor to use when editing large pieces of text. | 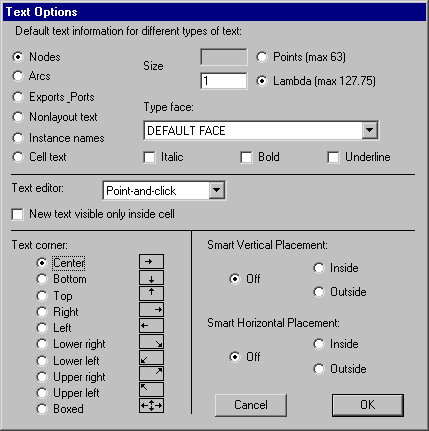 |
 | These commands allow you to view the circuit in 3-dimensions. When viewing in 3D, you cannot edit the circuit: you can only control of the 3D view. |
| View in 3 Dimensions | This switches the display to a 3-dimensional view of the circuit. |
| View in 2 Dimensions | This switches the display back to a standard 2-dimensional view of the circuit. | |
| Rotate View Point | This command sets rotate-mode for the 3D display, in which cursor movement rotates the objects. | |
| Zoom View Point | This command sets zoom-mode for the 3D display, in which cursor movement up and down zooms the display in and out. | |
| Pan View Point | This command sets pan-mode for the 3D display, in which cursor movement shifts the display. | |
| Twist View Point | This command sets twist-mode for the 3D display, in which cursor movement rotates the display of the objects. | |
| 3D Options... | This command provides options for the 3D display, including the depth and thickness of individual layers, and whether or not to use perspective. |
| This command provides a dialog for adjusting the location and size of the components menu, which is initially on the left. Note that the number of entries is chosen for each technology to include the necessary nodes and arcs. If the new size contains too few entries, some components will be unavailable. If the new size contains too many entries, extra menu items will appear that may be undefined in function. | 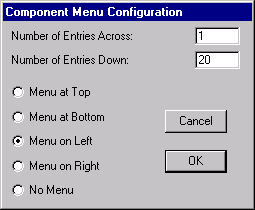 |
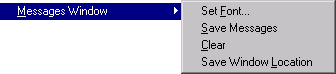 | These commands control the messages window. |
| Set Font... | This command provides a dialog for selecting the font and size of the text in the messages window. |
| Save Messages | This command causes all subsequent text displayed in the messages window to be saved to disk in the file "emessages.txt". | |
| Clear | This command removes all text from the messages window. | |
| Save Window Location | This command causes the location of the Messages window to be saved with the options (this is not needed on the Macintosh because changes to the Messages window are always remembered). |
 |
Previous |  |
Table of Contents | Next |  |