 |
2-1: Selection |
|
|
2-1: Selection |
|
Electric is a noun/verb system, meaning that all commands work by first selecting something (the noun) and then doing an operation (the verb). For this reason, selection is important.
Selection is done with clicks of the selection button (this is typically just the left button). Individual nodes and arcs are selected by clicking over them. Once selected, they are highlighted on the screen. If you use the toggle select button (typically the same as the selection button but with the shift key held), unhighlighted nodes and arcs are added to the selection, but objects that are already highlighted become deselected.
If there are multiple objects under the cursor, use the select another button to cycle through them (this is typically the same as the selection button but with the control key held). If there are multiple objects under the cursor, and you are trying to do a toggle select to add to the selection, then use the toggle select another button to cycle through them (this is typically the same as the selection button but with the control and shift keys held).
To select an object by its name, use the subcommands of the Selection command of the Edit menu. The Select Node... subcommand selects a node by name, Select Arc... selects an arc by name, Select Network... selects a network by name, and Select Export... selects an export by name. You can also use the Cell Explorer to select from a list of objects (see Section 3-7).
To select everything in the cell, use the Select All subcommand of the Selection command of the Edit menu. To select everything in the cell that is the same as the currently selected objects, use the Select All Like This subcommand of the Selection command of the Edit menu.
 | Highlighted objects have a box drawn around them. In some cases, the object extends beyond the box, but the box encloses the essential part of the object. For example, MOS transistors are highlighted where the two materials cross, even though the materials extend on all four sides. Also, CMOS active arcs have implants that surround them, but the highlight covers only the central active part. |
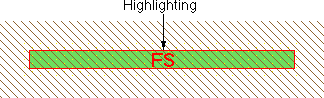
Besides the basic box, there will be other things drawn when an object is highlighted. Highlighted arcs have their constraint characteristics displayed. The example above shows an arc that is both fixed-angle ("F") and slidable ("S"). The letter "R" is used for rigid arcs, and an "X" appears when none of these constraints apply. See section 5-1 for more information on arc constraints.
When nodes are selected, a port is also highlighted. The port that is highlighted is the one closest to the cursor when the node is selected. If the port is a single point, you see a "+" at the port. If the port is larger than a single point, it is shown as a line or rectangle.
| Highlighted nodes will also show the entire network that extends out of the highlighted port. Arcs in that network will be drawn with dashed lines, and nodes in that network will be indicated with dots. The example here shows the highlighting of a pin node (in the upper-right) with a single-point port ("+") which is connected to a contact and a transistor. | 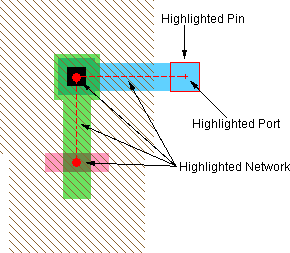 |
It is important to understand that Electric is not a WYSIWYG editor (what-you-see-is-what-you-get). Nodes that are touching on the screen may not actually be connected if there are no arcs joining them. The best way to ensure that the circuit is correct is to highlight a node and see the extent of the connections on it.
Besides highlighting nodes and arcs, Electric can also highlight an arbitrary rectangular area. The notion of a highlighted area, as opposed to a highlighted object, is used in some commands, and it generally implies highlighting of everything in the area.
There are two ways to highlight an area. If you click the selection button where there is no object, and hold it down while dragging over objects, all of those objects will be highlighted. If you need to start the area over an existing object, first deselect everything and then use the toggle select button.
To more precisely define a highlighted area, drag a rectangle using the rectangle select button. This leaves the highlight rectangle on the screen exactly as it was drawn. You can convert this selection to a set of actual nodes and arcs with the Enclosed Objects subcommand of the Selection command of the Edit menu.
Highlighted text appears as an "X" over the letters. However, text is a special case, so it will not be covered until later (section 6-8). For now, if you highlight some text, it is best to click again and select something else.
Once a selection is made, you can save it with the Push Selection subcommand of the Selection command of the Edit menu. The highlighting is not changed, but it is saved on a stack. To restore this selection at a later time, use the Pop Selection subcommand.
The Deselect All Arcs command deselects all selected arcs. This is useful when you wish to select a set of nodes, but you have selected the entire area, including nodes and arcs. The Select Nothing command deselects everything.
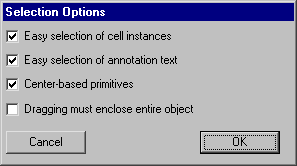 | To control special selection features, use the Selection Options... subcommand of the Selection command of the Edit menu. The "Center-based primitives" option controls how primitive nodes are created (see Section 2-2). The "Dragging must enclose entire object" requests that area-selection completely enclose an object in order to select it. The default is that any object touching the area is selected. |
In a busy circuit, many objects may overlap, causing confusion when selecting. To simplify selection, objects can be marked so that they are no longer easy-to-select, which means that standard selection does not work on them. When objects are not easy-to-select, they require the use of the special select button in order to find them (typically the same as the selection button but with the Alt/Meta/Option key held). Toggling selection of objects that are not easy-to-select requires the use of the toggle special select button. Cycling through multiple objects that are not easy-to-select requires the use of the special select another button. Finally, toggling and cycling through objects that are not easy-to-select is done with the toggle special select another button.
Ease of selection extends to more than just nodes and arcs. There are four "classes" of objects that can be selected:
Although all nodes and arcs are typically easy-to-select, you can control them individually by unchecking the "Easy to Select" field in their info dialog (use the Get Info command of the Info menu). If multiple objects are selected, the Get Info dialog has a popup in the lower-right for changing their selection difficulty. Special commands exist in the Selection menu for dealing with easy-to-select nodes and arcs. You can select all of the easy-to-select objects in the current cell with the Select All Easy command. Similarly, you can select those that are not easy-to-select with the Select All Hard command. To change the ease of selection for a set of objects, select them and use either Make Selected Easy or Make Selected Hard.
 |
Previous |  |
Table of Contents | Next |  |