 |
9-5: Routing |
|
|
9-5: Routing |
|
Some of these routers make use of the "Unrouted Arc", a thin-line arc that can connect any two components. Creating "rats nests" of these arcs forms a graphical specification that the router can use. The unrouted arc is from the Generic Technology (see Section 7-9). To create one, use the Get Unrouted Wire subcommand of the Routing command of the Tools menu before making a connection. Another way to get unrouted wires is to select all or part of an existing route (made with any arc) and use the Unroute subcommand.
Finally, the Copy Routing Topology and Paste Routing Topology subcommands can be used to create unrouted arcs in one cell (the "pasted" cell) where there are connections of any kind on another cell (the "copied" cell). The Paste Routing Topology command uses node and arc names to associate the two cells.
The auto-stitching router looks for adjoining nodes that make implicit connections, and places wires at those connections to make them explicit. For example, if a cell has power and ground rails at the top and bottom, and there are ports on the left and right of each rail, then the auto-stitching router can be used to connect all of these rails in a horizontal string of these cells.
The auto-stitcher places a wire when all of these conditions are met:
To run the auto-stitcher, use the Enable Auto-Stitching subcommand of the Routing command of the Tools menu. The router will make all necessary connections, and incrementally add wires as further changes are made to the circuit. To stop stitching, use the same menu entry, which now reads Disable Auto-Stitching. To run the auto-stitcher only once, and in the highlighted area only, use the Auto-Stitch Highlighted Now subcommand. Note that this auto-stitches all cell instances that intersect the highlighted area, so even if only a portion of a cell falls into the highlighted area, the entire cell is stitched.
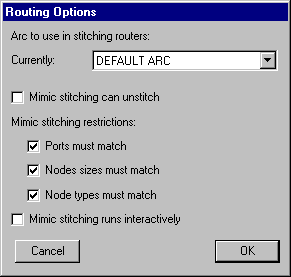 | The auto-stitcher allows you to specify a particular type of wire to use in routing. By default, the router figures out which wire to use. However, with the Routing Options... subcommand, a specified wire can be given (or automatic selection can be resumed by selecting the "DEFAULT ARC" entry). |
One problem with the auto-stitcher is that it may take a different view of the circuit than originally intended. In an area where more than two cells meet, the auto-stitcher may place many wires in an attempt to connect all touching ports. Another problem with the auto-stitcher is that it makes explicit only what is already implicit, and so cannot add all necessary wires.
To control the wiring of arrays of cells more directly, there is the mimic-router. This tool lets the designer place a wire between two cells, and then it adds other wires between all other similarly configured cells in the circuit. Thus, it mimics your actions.
Specifically, it mimics single wires (if you make a multibend wire, that cannot be mimicked) in all situations where the same ports on the same type of nodes exist, separated by the same distance.
The Routing Options... command provides variations on these rules. First, you can request that the mimic stitcher also mimic wire deletions. Second, you can request that the mimic stitcher relax its restriction about mimicing arcs (by allowing the ports to be different, the nodes to be different, or the node sizes to be different). You can also ask the mimic stitcher to work interactively, which causes it to examine all possible restriction sets, offering to route wires with increasingly relaxed acceptance criteria.
To turn on the mimic-stitcher, use the Enable Mimic-Stitching subcommand, and to disable the subsystem, use the command in the same menu location, which now reads Disable Mimic-Stitching. You can also request that the mimic-stitcher run just once (mimicing the very last wire that was created or deleted) by using the Mimic-Stitch Now command. Finally, you can request that the mimic-stitcher run just once, mimicing the currently selected arc, by using the Mimic-Selected command.
The maze router replaces unrouted arcs with actual geometry. The Maze-Route Selected subcommand replaces the selected unrouted arcs, and the Maze-Route Cell subcommand replaces all unrouted arcs in the cell.
Note that maze routing is done one wire at a time, and may fail if no path can be found. Therefore it may be preferable to route the unrouted wires one-at-a-time in order to better control the process.
Note also that maze routing constructs an array which is the size of the circuit, and searches the array for a routing path. Therefore, long wires will use large amounts of memory and time.
For an example of maze routing, open the library file "samples.txt" and edit the cell "tool-RoutingMaze" (you can read the library with the Readable Dump subcommand of the Import command of the File menu). This cell has a number of unrouted wires that can be routed.
River routing is the running of multiple parallel wires between two parallel rows (presumably along facing sides of two cell instances). The wires must remain in sequential order and cannot cross each other. Thus, they appear as a flowing stream of lines, and have the appearance of a river.
To specify an intended path for the river-router, every connection must be made with an Unrouted arc. Thus, before river-routing, there should be a series of direct (and presumably nonmanhattan) unrouted arcs. These arcs ares replaced with the appropriate geometry during river-routing.
To convert the unrouted wires into layout, use the River-Route subcommand of the Routing command of the Tools menu. If there are unrouted arcs selected, these will be the only ones converted. Otherwise, all unrouted arcs in the cell will be converted. If it is necessary, nodes may be moved to make room for the river-routed wires.
The river router always routes to the left or bottom side of the routing channel. Thus, if there is a vertical channel that is very wide, the wires will run to the left side and then jog to their proper location there. The only way to force routing to the right or top side is to rotate the entire circuit so that these sides are on the left and bottom.
For an example of river routing, open the library file "samples.txt" and edit the cell "tool-RoutingRiver" (you can read the library with the Readable Dump subcommand of the Import command of the File menu).
 |
Previous |  |
Table of Contents | Next |  |