6-2: Creation Defaults |
6-2: Creation Defaults |
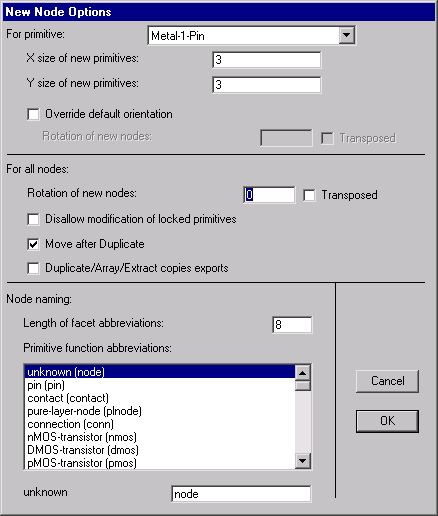
The New Node Options... command of the Edit menu provides a dialog for changing this information on subsequently created nodes. You can change the default size of any primitive node in the current technology by choosing the node and changing the values. Note that the default unit for typed values is lambda, unless another unit is explicitly mentioned (for more on lambda, see Section 7-2). You can change the default orientation of these primitives by checking "Override default orientation" and then entering the new rotation and transposition.

The options in the middle section of the dialog apply to all new nodes. You can specify a default orientation (rotation and transposition). For more on orientation, see Section 2-6.
The check box "Disallow modification of locked primitives" requests that all lockable primitive node instances be anchored. Once locked, these nodes cannot be created, deleted, or modified in any way. Typically, only primitives in "array" technologies are lockable (such as the FPGA technology, described in Section 7-8), presuming that these components will be used to define the fixed circuitry that is then customized. Design of the fixed circuitry is done with this lock off, and then the customization phase is done with this lock on.
The check box "Move after Duplicate" allows duplicated objects to be positioned interactively. This is the default condition. However, if this is unchecked, then the Duplicate command of the Edit menu will place a copy automatically, without allowing the new location to be specified by the cursor. This has the advantage that it learns the location to use from past actions, so repeated Duplicate commands can be used to automatically place things regularly.
The check box "Duplicate/Array/Extract copies exports" requests that all node-copying operations also copy their exports. This includes the Duplicate and Array commands of the Edit menu and the Extract Cell Instance command of the Cells menu. By default, exports are not copied with their nodes.
The bottom section of the dialog allows you to specify node names to be used for the different types of nodes. These names are used when automatically naming nodes during netlisting. They are also used by the Name All In Cell and Name All In Library subcommands of the Special Function command of the Edit menu, which apply names to nodes and arcs.
| Previous | Table of Contents | Next |