 |
3-6: Exports |
|
|
3-6: Exports |
|
All nodes in Electric have connection sites, called ports, which indicate where wires may be attached. The primitive nodes have predefined ports, but ports on cell instances must be defined by the user. To do this, simply select a port on a node inside the cell, and turn it into an export, which makes it available on all instances of the current cell. Although most ports are on nodes along the edge of the cell, Electric makes no port location restrictions, so they may appear anywhere.
To see the location of all ports on the selected nodes, use the Show Ports on Node command of the Export menu. To see all exports that have been defined in the current cell, use the Show Exports command of the Export menu. The List Exports command gives the same information, but in text form and the Summarize Exports command gives a text list that is reduced where sensible.
| To create an export, select a port on a node and use the Create Export... command of the Export menu. The resulting dialog requests an export name and some characteristics. | 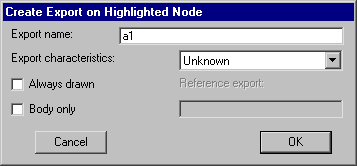 |
All export names on a cell must be unique; if a nonunique name is given, it is modified to be unique. This modification involves adding "_1", "_2", etc. to the end of scalar export names, or changing the index (from [1] to [2], etc.) for indexed export names. Like cell names, export names may not contain spaces, tabs, or unprintable characters. Although no case distinction is made between uppercase and lowercase characters, the original case usage is preserved.
Behavioral characteristics can be associated with an export by selecting the appropriate field in the export creation dialog. These behavior characteristics are stored with the export and used primarily by simulators. The characteristics include the following:
The "Always drawn" check box requests that the export label should always appear, regardless of the connection or expansion of its cell. Typically, an export label on an instance of a cell is not displayed when that port is connected to an arc or when the instance is expanded. This check box overrides the suppression.
Another special check box, "Body only," requests that this export not appear when an icon is generated for the cell. This is useful for power and ground exports or duplicate connection sites on a single network.
There are three special exporting commands that are primarily used in array-based layout. If a cell instance is replicated many times and the instances are wired together, then ports on the edge of the array are the only ones that are not wired. These ports define the connections for the next level of hierarchy. What you want to do is to create exports for all unwired ports on all cell instances. To do this, use the Re-Export Everything command of the Export menu, which generates unique names as it exports all unwired ports on cell instances. To do this same function, but only on the currently highlighted nodes, use Re-Export Highlighted. To do this same function, but only for Power and Ground exports, use Re-Export Power and Ground. Note that ports on primitive nodes are not exported with these commands. See Section 6-4 for more about arrays, and see Section 9-5 for more on automatic wiring.
Another special case in export creation is the Add Export from Library... command, which copies exports from another library to the current one. The other library is examined for cells whose names match ones in the current library. When a cell is found in the other library, all of its exports are copied to the cell in the current library (if they don't already exist) and placed in the same location. This command is useful in managing standard cell libraries that are imported from other file formats (see Section 3-9 on Standard Cell Libraries). Because some formats contain geometry and others contain connectivity, this command is needed to put them together.
Exports are selected by clicking on their text, or by clicking on the node from which they are exported. If a very dense design makes export selection hard, you can choose from a list by using the Cell Explorer's contents view (see Section 3-7) or by using the Select Export... subcommand of the Selection command of the Edit menu.
| Once a port has been exported, its characteristics can be modified by selecting the export name and using the Get Info command of the Info menu. You can change basic export information such as the name, characteristic, and reference name (if applicable). You can also change the appearance of the export by editing the size, font, style, placement, and rotation of the name. See Section 6-8 for more about text appearance. | 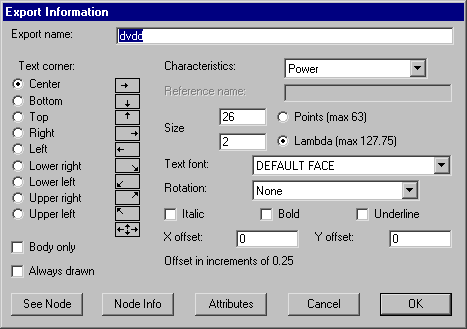 |
Buttons at the bottom of the Export Get Info dialog allow you to examine related objects. The "See Node" button shows the node on which this export resides, and the "Node Info" button brings up a Get Info dialog for that node. The "Attributes" button brings up an Attributes dialog for the export (see Section 6-8 for more on Attributes).
You can change the characteristics of many exports by selecting them and setting the "For all selected exports:" popup in the Get Info dialog of the Info menu. You can change the name of exports by using the Rename Export... command of the Export menu.
| Ports and exports can be displayed on the screen in many different ways. The Port and Export Options... command of the Export menu provides three options: "Full Export Names" shows full text names, "Short Export Names" shows export names only up to the first nonalphabetic character, and "Exports as Crosses" shows crosses at the locations. | 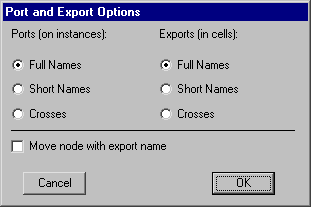 |
With short names, the exports "Power-left" and "Power-1" are both written as "Power," which allows multiple exports with the same functionality but different names to be displayed as if they have the same name. To remove port display completely, use the Layer Visibility command of the Windows menu.
You can delete an export simply by selecting its name and typing the delete key. You can also use the Delete Export command of the Export menu.
To remove many exports at once, the Delete All Export on Highlighted command removes all exports on all highlighted nodes. Also, the Delete All Export in Area command removes only those exports that are in the selected area (use the rectangle select button to define a precise area). When an export is deleted, all arcs connected to that port on instances of the current cell (higher up the hierarchy) are also deleted.
To move export text, simply select it and drag it. The location of the text has no effect on the location of the export: moving the text is only for improvement of the display. However, if you check "Move node with export name" in the Port and Export Options... dialog, then moving an export name will cause the node (and the export) to move as well.
It is sometimes desirable to keep an export but to transfer it to another node. If a cell is in use higher in the hierarchy, unexporting and then reexporting deletes all existing connections. Instead, the Move Export command of the Export menu can be used. Before using this command, two nodes and their ports must be highlighted with selection button and toggle select button. The export is moved from the first node to the second node.
 |
Previous |  |
Table of Contents | Next |  |