
Chapter 9: Tools
|
9-14: Inductors | |
Inductors can span multiple arcs in Electric, and some technologies even have inductor nodes. All of this is managed with the Manage Inductors... command (in menu Tools / Inductors). Once inductors have been established, you can also write a deck for further analysis by FastHenry.
This dialog lets you manage inductors in the current cell. If you edit a different cell, click "Recache Current Cell" to see the current cell's inductance information.
The top part of the dialog, with the list of inductors in the cell, allows you to create new inductor (with the "New..." button). You can rename a single inductor or all of them (the "Rename All..." option prompts for a string with an "*" in it and renames every inductor with that pattern, substituting increasing numbers where the "*" is). You can also delete inductors, but note that if an inductor is listed because there is an inductor node with that name, you cannot delete the inductor in this dialog and must instead delete the inductor node.
The next part of the dialog lists arcs on the selected inductor. You can click the "Detect" button to figure out which arcs are connected by following the inductor node through the circuit. If there is no inductor node present, this button does nothing. You can also assign arcs manually by selecting them in the circuit and clicking the "Add" button. You can remove manually-added arcs from an inductor by selecting them in this dialog and clicking the "Remove" button. Note that this dialog cross-probes correctly between the list of arcs and the arcs in the circuit: clicking on either shows the other. Finally, you can request that all arcs on the inductor be "shortened" (have their end extension removed) by clicking the "Shorten" button.
|
The next section of the dialog lets you assign analysis factors for FastHenry.
FastHenry is an inductance analysis tool (see the papers of Jacob White).
You can set the thickness and Z height of this inductor,
and you can set the number of subdivisions of the width and height.
Note that default value are shown that will be used if no value is given in this dialog.
The bottom part of the dialog is able to do simple inductance computation. It uses a formula that depends on the area and length of the inductor as well as a corner-turning factor. Click the "Analyze" button to show the computation of the current inductance value (and click "Clear" to remove that text). Click the "Annotate" button to assign the computed inductance to the inductor node (if there is one). | 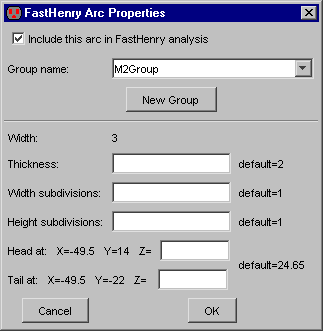 |
The area and length factors may have suggested values, depending on the layer of the inductor. Click the "Use" buttons to apply these values.
You can also click "Update All Inductors in Cell" (at the top of the dialog) to request that the dialog watch all edits made to the cell and update all inductance values, doing a "Detect" of the arcs, an "Analyze" of the inductance, and an "Annotate" to update the inductor value. This operation can also be invoked directly on every inductor in the cell with the "Analyze & Annotate All" button.
At the very bottom are controls for experimenting with different inductor widths. By default, the width is derived from the size of the inductor nodes and the connected arcs, but you can override this value by setting it in the "Inductor width" field then clicking the "Analyze with new Width" button. If you like this new width, you can then change the size of the inductor node and connected arcs by clicking the "Apply new Width" button.
After all of the inductors have been identified, you can generate a FastHenry deck with the Write FastHenry Deck... command (in menu Tools / Inductors). Before doing that, however, you can set other options for FastHenry deck generation. To do this, use the FastHenry Preferences (in menu File / Preferences..., "Tools" section, "FastHenry" tab).
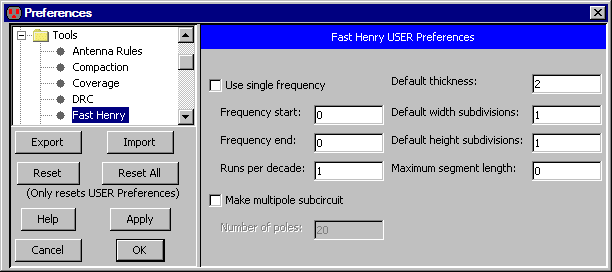
This dialog allows you to set the type of frequency analysis (single frequency or a sequence specified by a start, end, and number of runs per decade). You can choose to use single or multiple-pole analysis (and if multiple, you can specify the number of poles). The FastHenry Preferences dialog also allows you to set defaults for the FastHenry factors. You can specify the default thickness, and the default number of subdivisions (in height and width).
 |
Previous |  |
Table of Contents | Next |  |