
2-4-2: Other Modification
Chapter 2: Basic Editing
|
2-4: Circuit Modification 2-4-2: Other Modification |
|
|
Another way to move a node is to use the Object Properties... command (in menu Edit / Properties), and type new X and Y positions. This dialog allows other modifications to be made as well (orientation, etc.) The dialog shows the location of the anchor-point of the node. | 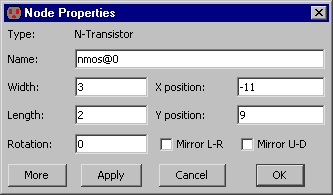 |
The dialog also has a field for the node's name. This name is not related to network information, but it must be unique, and can be used for identification. If a schematic node is given an arrayed name (such as "and[0:3]") then it indicates that the node is arrayed that many times. Nodes (and arcs) are automatically given unique names when first created (such as "nmos@0").
|
The Object Properties dialog is modeless: it can remain on the screen while other editing is being done. If a different node is selected, the dialog updates to show that node's information. The "Apply" button changes the selected node to match the new values typed into the dialog. The Object Properties... dialog can also expand to show more information. When the "More" button is clicked, it grows to full size as shown. The full size Object Properties... dialog has many new controls, which vary according to the type of node selected: | 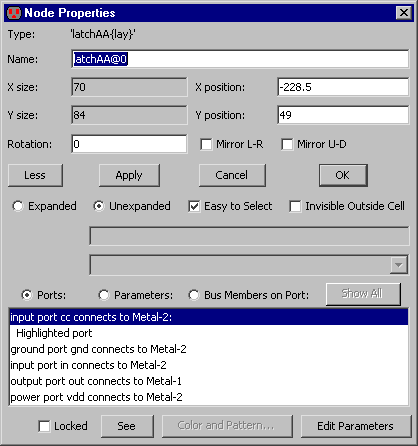 |
The bottom of the expanded Object Properties... dialog has a scroll area that can view "Ports", "Parameters", or "Bus Members on Port". By default, a list of the node's ports is shown, including any exports, connections, and highlight details. The "See" button selects the selected object in the list, either a port or an arc. If the "Parameters" button is selected, the list shows the parameters on the node. When "Parameters" is selected, the entries in the list let you modify individual values. Note that there is also an "Edit Parameters" button, which brings up a full dialog for editing them. See Section 6-8-5 for more on Parameters. The last button, "Bus Members on Port" lists all of the signals found on the currently selected bus port (see Section 6-9-3 for more on busses).
In some situations, the list may be too large to display easily (for example, a cell instance with hundreds of ports). When the list contains more than 100 entries, only the first 100 are shown, and the "Show All" button is available to show the entire list.
If many objects are selected, you can move them by a specific distance with the Move Objects By... command (in menu Edit / Move).
If many nodes are selected, the Object Properties... command will list all of them, and allow appropriate changes to be made (depending on what is selected).
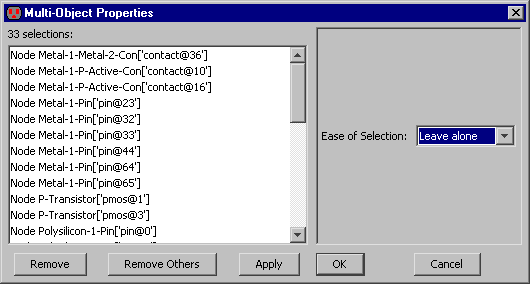
Changes are only made in the fields where you type a value. To remove an item from the list of selected objects, use the "Remove" button. To remove all but the selected item, use "Remove Others". If only two objects are selected, this dialog shows the distance between their centers.
 |
Previous |  |
Table of Contents | Next |  |