Chapter 1: Introduction
plug
1-10: IC Layout Tutorial
1-10-2: IC Layout Tutorial: Create a Node
plug


Layout is placed by selecting nodes from the side bar's components menu, and then wiring them together. This example shows two nodes that have been created. This was done by clicking on the appropriate component menu entry, and then clicking again in the editing window to place that node. After clicking on the component menu entry, the cursor changes to a pointing hand to indicate that you must select a location for the node. When placing the node, if you press the button and do not release it, you will see an outline of the new node, which you can drag to its proper location before releasing the button.


In this example, the top node is called Metal-1-Polysilicon-1-Con (a contact between metal layer 1 and polysilicon layer 1, found in the fifth entry from the bottom in the right column of the component menu). The node on the bottom is called N-Transistor (lower-right entry of the component menu). Both of these nodes are from the MOSIS CMOS technology (which is listed as "mocmos" in the status area).
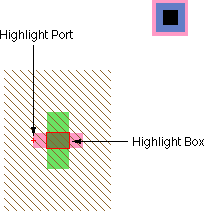
Figure 1.5


Prev Previous     Contents Table of Contents     Next Next